Tea Towel Aprons

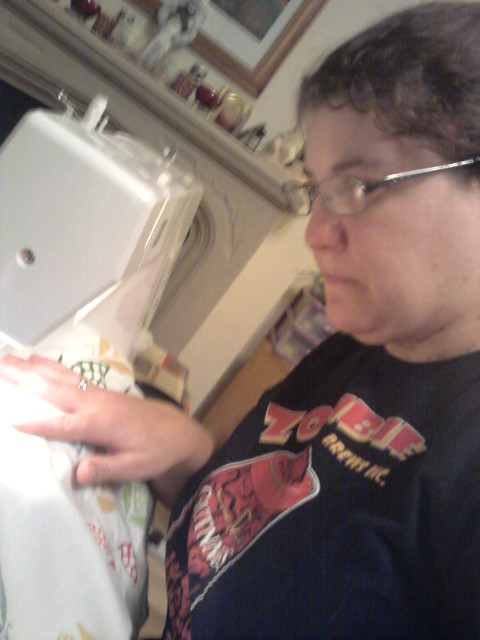
Not so long ago, I took a class for sewing. I did enjoy the class, and after checking a few of the local advertising websites, I found someone who no longer needed their machine and I bought one for 50 Euros. Since then, I have been working hard to make “friends” with it.

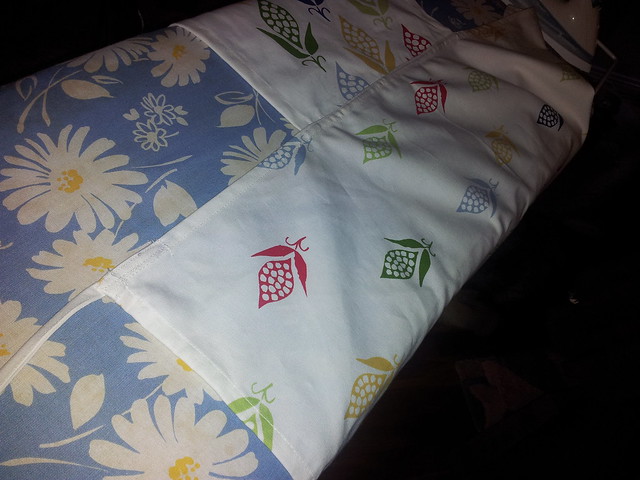
I’ve hemmed up a couple pairs of trousers, and then I started looking online for some simple ideas for beginning users of sewing machines. One of these was to make tea towel aprons. The great thing about the idea is that I already had a few adorable “corn” themed tea towels (a set of 3) which I had gotten from Ikea earlier and had been saving as my “good” towels. Well, I thought, I hadn’t used them because I adored the fabric pattern – and I didn’t want to get them dirty or stained. This was the perfect chance to convert them into something that I would actually use, practice my sewing, and which would also end up in the corner of my kitchen – instead of hidden in the drawer.

For this project, you need 3 tea towels to make 2 aprons, some binding or ribbon for straps (I used 1 meter & 1/2 per apron or 3 meters total). (Since doing this, I have discovered there is an easier way – but this is how I made mine).

Step 1: Ironing the aprons. I had to iron the aprons to get them nice and neat. Once ironed, I folded them in half (short end to short end) and ironed a crease in the middle.
Step 2: Choose two aprons for the bottom “skirt”, and one that will be cut in half for the top. You’re going to make these into a “T shape, where the long part of the T intersects the short “half” of the other piece.
Step 3: Cut the tea towel in half. Hem cut end.

tea towel aprons

Step 4: Pin the 1/2 tea towel now hemmed to the full towel in the middle to form a T type shape. This will form the basic shape of the apron.
Step 5: Sew together

tea towel aprons

Step 6: Now that you have the “T” shape you have the basic apron. Cut 3 – 1/2 meter lengths of the binding or ribbon. Attach one piece to either of the ends of the apron skirt to tie around your waist.
Step 7: Cut the remaining 1/2 meter ribbon or binding in half (1/4 meter) and sew onto the corners of the top of the apron to tie around your neck. (You could also measure and make it a loop if you didn’t want to “tie” it together)
Step 8: Press.

tea towel aprons

Step 9: repeat with the other full towel / remaining piece of apron.

Step 10: model your creations!

tea towel aprons

tea towel aprons

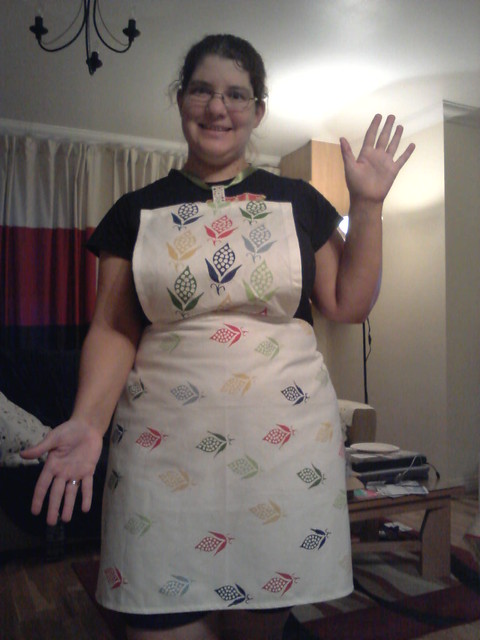
Notes: Notice that I did the necklines two different ways. This is because the one apron had the “drawer” hang on it. I thought that rather than sewing the ribbon on, it might be easier to use that and loop the ribbon through. The second one, I decided that I prefer it – because of how the ribbon was sewn into the corners of the top. It just felt more secure. I may eventually go back and re-do the one (and not bother with the hang loop) but we’ll see.

I think I’m going to be making a few of these as Christmas Gifts, as part of my homemade holiday goals.

Share

Pottery Experience

Back when I was in high school, I did a 9 week segment in clay, pottery building, and sculpture. As part of this, we learned the basics of slab and coil construction as well as using a potter’s wheel. Earlier this year, when there was a Groupon deal for a “pottery experience” at Artworks Cafe in Portmarnock including tea, cake, 1 painted item and a basic lesson in making a pot on the wheel for two people (45 Euro) I couldn’t resist. This past weekend, I used my voucher and here are the pre-fired results.

When I first arrived, we were seated at a bunch of tables and given a choice of a plate with rim, a plate with no rim, or a mug to paint and fire. I chose a plate. From there, they gave us the option to draw a design or use a bunch of books (or various internet sites) to search for our own design for the pottery. Halloween is near, and after flipping through several books, I found the inspiration for my design:

pottery experience

Because everyone else was busy with the tracing paper, I figured I could free hand draw it on the plate (the picture itself was way too big) and I added some of my own touches. Long before the others were started painting, I picked up the brush and started on with my design. First, I mixed up the green, and then I painted the black hat.

pottery experience

Meanwhile, A chose his mug and began drawing a simple design on his as well. Shortly afterward, we were invited over to the landing and shown the basics of potting on the wheel. I was the only person who had done it before – and went first after the teacher.
pottery experience

I managed to quickly center my little slab of clay and began shaping. I think I forgot how much strength this can take – and just how messy it is, but the basics from my art class still remained.
pottery experience

Adding water, I continued to work the clay into a rounded bowl shape.

pottery experience

Eventually, I worked it up into a bowl, and added a lip. Sadly, though, when I turned to have a picture made – I nicked it – thus, you see the dent in the corner –

pottery experience

In the end, however, after a little more working, I decided to let the “nick” be a feature, added some stripes with one of the clay working tools and called it done. (It was easier than destroying the entire piece and starting over). It will take 3-4 days to dry, and then will be dipped into green before being fired and glazed.

Next up it was A’s turn. He’d never done this before, and it took him longer to get the clay centered. (I recall this took the longest time to learn for me as well). He did eventually get the piece centered and started out making the little bowl too.

pottery experience

He raised the sides and, as is common when trying to make a pot on the wheel, found that the pressure has to be exactly even – or the pot goes wonky and off center.

pottery experience

He kept working at it though, and while still off kilter, it did become a small bowl shaped piece, and one which as a first time attempt is quite good.

pottery experience

When we were both done, we went back to painting.

pottery experience

About an hour later, my “magic” plate was finished being painted

pottery experience

as was A’s mug:

pottery experience

We both had such a nice time, that we’re for sure going to have to go back and paint / play on the wheel more. At this point, we’re just waiting for the projects to be fired – This happens every couple weeks – and then for them to text and let us know that they’re ready. I’ll post the pictures when they are done. Otherwise, I would recommend taking the chance to do some pottery painting (I think even the kids will like it as it’s quite hands on) and/or get messy with the wheel. Also, if you’re in the area, I would recommend the Artworks Cafe, for sure.

Share

12 weeks ’till Santa Comes

Rudolf packages after snow

Can you believe it!?! It is only 12 weeks until Santa comes and the rush is on. I’ve set a goal for myself that I will try to hand make as many of my gifts as possible. Not only may it be less expensive, and I get to use some of my talents, but it also will be more customizable to each person that I want to give a gift.

So, what am I doing?

Crochet – scarves, bracelets, etc.
Jewelry – stringing some beads into necklaces
Sewing – making tea towel aprons, pillows, etc.
Paper crafts – think stationary, cards, etc.
Pottery / ceramics – painting some fun pieces of pottery to give as gifts

In the last couple of months, I’ve had a class in sewing for a machine and learned to use a sewing machine. Over the weekend, I found a place to let me use the pottery wheel and also to paint some pre-formed ceramics for a reasonable price. They’ll fire it and glaze it, and after a couple of weeks, you get it back – perfect for gift giving and/or keeping for myself.

Luckily my Christmas gift list isn’t too long, and in 12 weeks, theoretically, if I plan everything right, I should have enough time to complete what I want to.

I want to point a few great sites that I’m using for inspiration –

Crochet me – Fabulous site with lots of free and paid crochet patterns. They have a great magazine for crochet called Interweave crochet that I’m subscribed to and have learned some new stitches from.

Ravelry – They’re a knitting and crochet community and they have several project ideas and free patterns that are available for everything from hats and scarves to afghans, sweaters, and more.

Craftsy – what can I say other than I love this site. I’m not a “single item” crafter. I’m more of a Jill-of-all-trades where I find that one piece of something can influence another of the many projects that I have going or would like to try. This site has a little bit of the crochet/knitting, but also has sewing projects, paper crafts, jewelry, and so on.

Crafts Beautiful – this is a magazine that gives away free crafting items (who doesn’t love that) once a month. They have a little bit of everything – and while I don’t always like everything, it really gets my creative juices flowing. The latest magazine that I bought had a bunch of Christmas themed papers – perfect for the holiday cards.

Pinterest – photos galore. Everything from beginning to end from colors to jokes, to patterns that are linked from what others have done.

CreateForLess – repository for lots of craft supplies that are reasonably priced. They also have craft ideas, and they tend to keep me within budget on whatever I want.

Wish me luck, and expect more posts with some of the finished projects coming soon.

Share