Toothpaste / toothbrush travel Roll

travel toothbrush and toothpaste holders

As I get ready to travel and am packing up, I am reminded of when I first started sewing back in 2012. You see, I was looking for simple homemade gifts that I could easily put together. After checking pintrest, I came up with making a toothpaste roll and modified a pattern to look a bit snazzier than what I found.
Tutorial here. Once made, they are great to travel with!

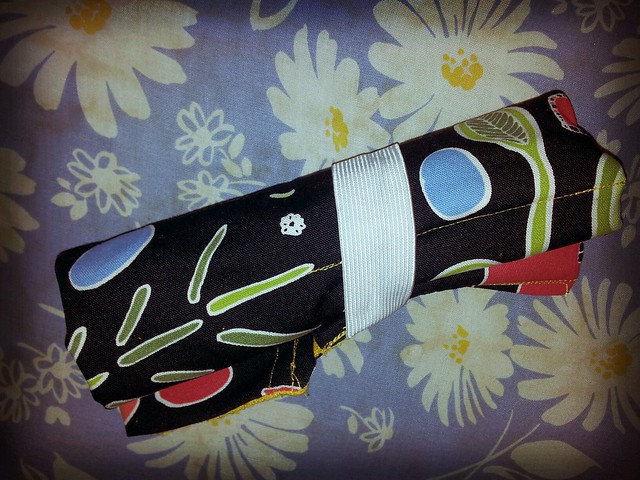
Basically, what you do is you take a wash cloth or a hand towel and cut so that the top and bottom are able to fold over the height of a tooth brush. Then, you pin a piece of fabric to it and sew around the edges.

travel toothbrush and toothpaste holders

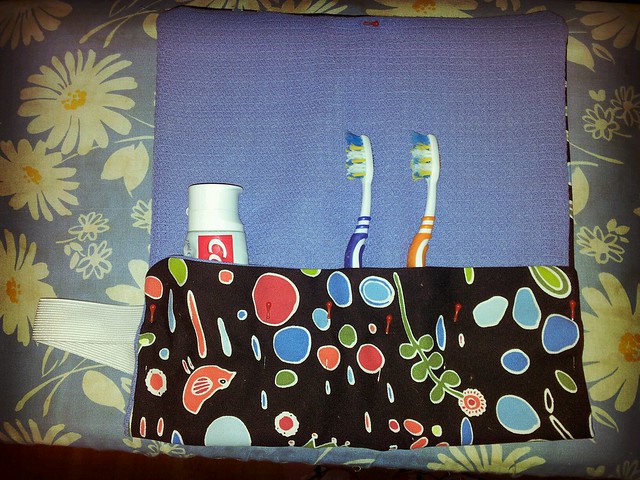
Once turned inside out, you fold up the end and add an elastic band and space stitches vertically to hold your toothpaste and tooth brushes.

travel toothbrush and toothpaste holders

The end product is pretty cool because it not only folds over from top to bottom on the toothbrushes (and keeps them clean) but it also rolls up for easy packing.

travel toothbrush and toothpaste holders

Oh – and one other idea – I made a bunch of these as Christmas gifts. Mom didn’t like the idea that it was for toothbrushes, so she made it work for her earrings and necklaces. Viola. Magic.

Share

Tea dish towels to Throw Pillow in an Afternoon

From Tea towel to Throw pillow in an afternoon....

Not so long ago, I was in Ikea. Now one of the coolest things about Ikea is that they have some great “line art” designs in both fabric and modern design. While I was there, they had some beautiful tea towels (hand towels) for sale. They were simplistic trees with nice retro colored leaves in browns, yellows, blues and burgundy. It reminded me of something out of the 1970’s.

From Tea towel to throw pillow in an afternoon...

The thing is that as good heavy cotton fabric, I thought they were just too pretty to take out and use as tea towels / dish towels. So, after a couple days of thinking about it, I pulled them out of the bag and ironed them flat. I decided that they would make great throw pillow covers.

Thus began the remake. I measured out the length of the pillows and cut some light tan (actually recycled from old sheets) fabric that I had saved. It came up just about 2/3 of the way on the towel itself. I then sewed it with french seams (front side to front side – sew, turn inside out and sew) around the edges:

From Tea towel to Throw pillow in an afternoon....

Then, I attached 2 buttons on the reverse of a couple pillows, before deciding that I liked the velcro look better for the other two. Inserting the pillow I already had from the sofas – the total time spent was an afternoon for 4 pillow covers that can be washed, removed, and are totally match my decor.

From Tea towel to Throw pillow in an afternoon....

How sweet are these little “tree of life” throw pillows from a cotton towel? And the best part? It cost me about 2 Euro a pillow.

Share

Tooth fairy Pillows

Over the weekend, I dug out the sewing machine. The funny thing is that I often get asked about ‘fixing’ things using my sewing machine, and the only time that I ever do get out the machine is if someone else asks me to do something for them. I’m not the world’s best at sewing, nor am I very fast at it. To be honest, it is my least favorite “crafty” thing to do, but if I have to I can do it. The result is that when the machine is out (about once every 6-8 months) I go through and “binge sew” on it – to repair everything that needs reparing, make what needs making, and then call it good. I then pack up the machine and it doesn’t see the light of day for another 6-8 months.

Bibs for Orliath

Yesterday, I told you what got me started on my “sewing” binge – the need to repair four bibs. The thing is that while I was at it, I remembered that I had promised my niece and my cousin’s daughter that I would make them tooth fairy pillows. A tooth fairy pillow is a little tiny pillow with a pocket. As a child begins losing their baby teeth, they put them into the pillow where the tooth fairy can easily take them (without getting squished by the sleeping child) and leave a little gift in return.

Bibs for Orliath

After making the bibs, I had some leftover cotton fabric, and thought this would be fun to use for the kids. I cut some small 4 x 4 inch squares and on one piece of fabric, sewed a little pocket. From there, I pinned the right sides of the pillow together, along with the ribbon to use to hang from the door.

Bibs for Orliath

I sewed the right sides together, trimmed the excess fabric,

Bibs for Orliath

and then turned the pillows inside out.

Bibs for Orliath

Making a french seam, I now sewed around the pillow again – making sure to hide the previous stitch and avoid catching the “door loop” in the stitches.

Bibs for Orliath

Having left a small opening for the “stuffing”, I turned the now stitched pillow right side out and then filled it with stuffing from old bed pillows – just enough to make it poofy. Now, I stitched up the hole in the bottom.

Bibs for Orliath

Viola! A little Tooth fairy pillow is complete!

Bibs for Orliath

Share