Sometimes, being a Jill of all Trades (or crafts in my case) makes for a bit of fun when shopping. I was at the Euro store near where I live recently buying the standard toothpaste, shampoo, conditioner, batteries and the like when I happened to head down the crafts aisle. Generally speaking, the crafts in the row are geared toward children, and sometimes you’ll get yarn or a bit of something that is for card making or can be used for something else. It’s usually inexpensive, and an almost never-ending supply of inspiration for me. Near Christmas, I saw a set of do it yourself magnets in a packet which got my wheels turning.

The craft set contained 5 unfinished ceramic tiles, a few acrylic pots of paint, self adhesive magnets, and a paintbrush – for 1.50 Euro. I went a bit mad and bought several packages, because I thought that I wouldn’t paint them – I would do permanent marker doodle crafts instead.

What are permanent marker doodle crafts you ask? Well, basically, you get sharpie brand markers (or other permanent markers) that you can draw with. You’ll need some ceramics (eg. A Mug, Tiles, ceramic box, etc.) and you doodle on them with the markers.

Then, you bake them in the oven at 350 F for 15-30 minutes to set the marker so it can’t be washed off. I’d seen some interesting ideas for this on Pintrest, and had been keeping my eyes peeled for something suitable to try this on. For me, I thought the magnetic tiles were going to be perfect as they were inexpensive and small enough I could try all the different colors / designs I had in mind.
Once I got home, I started out with my off brand permanent markers (again 1.50 Euro at the Euro store) and set to work. A few of my designs:
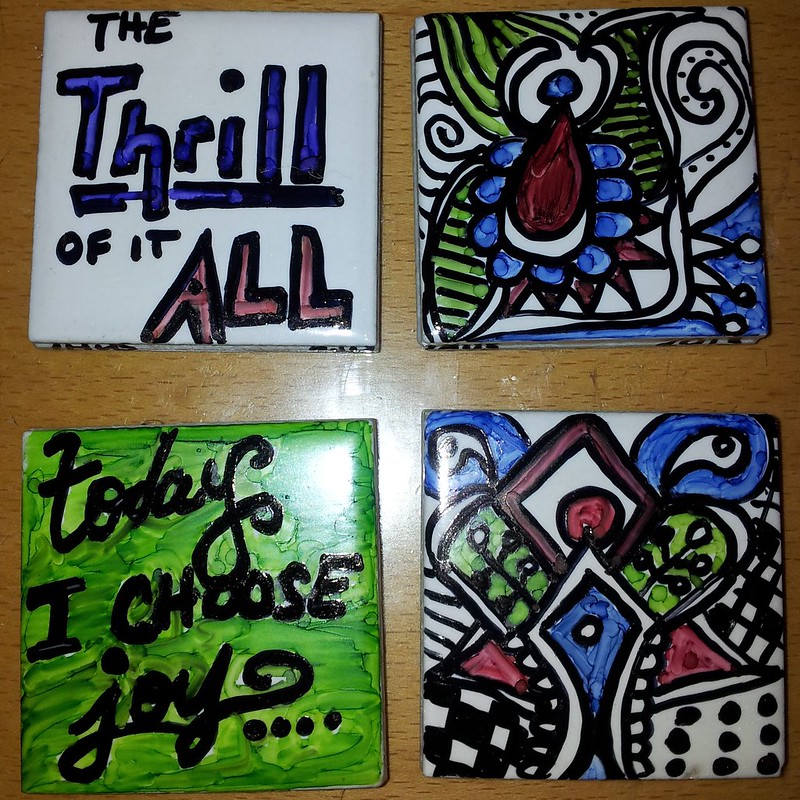


I really liked how bright and colorful they were, and was rather encouraged as I put them in the oven. I checked them at 15 minutes, and they weren’t even warm yet, so I put them on for 15 minutes more. Mistake.
You see, once the ceramic starts getting hot, the marker sets very quickly. And little did I know – the colors also change with the addition of heat. The black stays the same, but the Red turns pink or brown; the Bright Green turned yellow, the Violet went pale blue, and yellow? Well it turned orange. And they weren’t bright anymore. So, while I liked how they turned out – I ended up going back and re-coloring where I could and re-heating them a second time.
I realize now two things that would have made it easier –
a) You have to watch the heating process very closely – once they start to discolor they need to come out of the oven – immediately.
b) Rather than worrying about watching like a hawk – it may be best to use only black and the plain ceramic color to make the designs. I liked the addition of color in mine – but in the end, they would have been just as striking had they only been black / white.
After heating and befpre a bit of recolor/second baking you can really see the discoloration on the middle two:

What did they look like when they were done? Not bad – just not what I expected. And they still made great Christmas gifts for my homemade holidays. 2 per person – so out of 4 yellow packages; I got 10 unique Christmas gifts. It ended up being 0.75 Euro per gift – including the cost of the markers (which I still have plenty of use out of). Handmade AND inexpensive. Who can argue with that ?!?