Leo’s Birthday Circus

Leo's 3 Ring Circus Cakes. #PhotoGrid

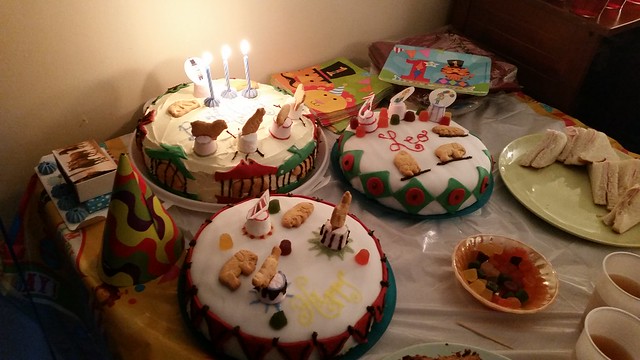
**Photo heavy. Please let this one load. ** One of my best friends in Ireland had a little boy who is celebrating his first birthday today. The birthday party theme is “circus”, and as a part of it, I was asked to make the 3 ring circus cakes.

I’ve made cakes before, and decorated them with regular icing and piping. However, this one was a challenge. This was my first time working with roll out icing, and I’m not sure I would do it again, though I’m quite happy with how they turned out. Everyone at the party was quite impressed.

Leo's First Birthday -3 ring circus cake

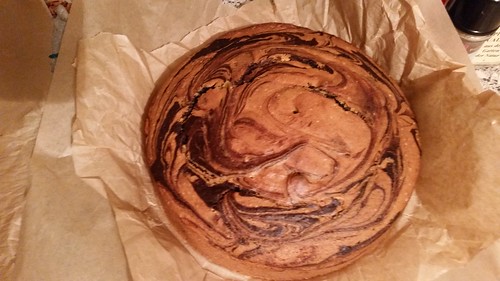
The first thing I did was Wednesday night, when I baked 3 marble cakes. There were 2 9-inch, and 1 12 inch made in the pan.

Leo's First Birthday -3 ring circus cake

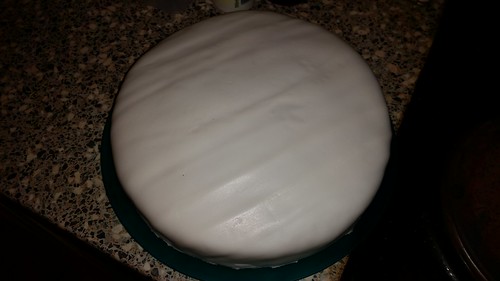
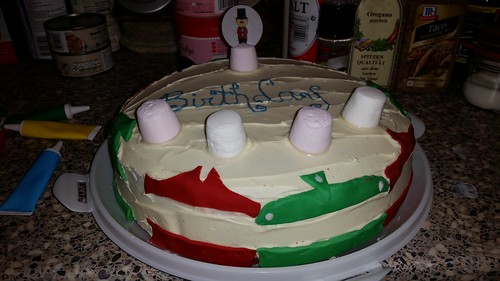
Thursday night, I frosted each one with a beautiful chocolate icing. Then, I added the rolled out frosting to the top and smoothed it out. Once that was complete, the decorating began.

Leo's First Birthday -3 ring circus cake

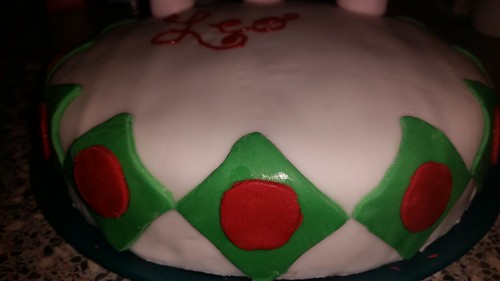
Colored Fondant was rolled out in green and red, and I cut out diamonds, circles, and little “flag” shapes to go around the edges of two of the cakes. For the third, the tops and bottoms of what would become the circus train were cut out and attached using sugar paste glue. I also added marshmellows (for the platforms for the animals) and some edible printed cupcake decorations which had the “tent”, “ring master”, and “clowns”.

Leo's First Birthday -3 ring circus cake

Leo's First Birthday -3 ring circus cake

Leo's First Birthday -3 ring circus cake

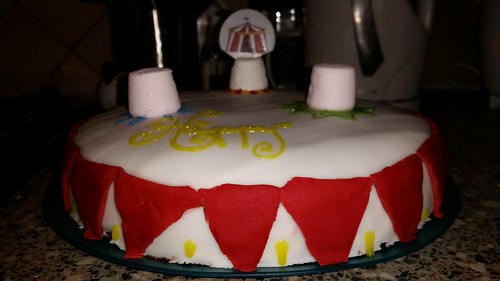
At that point, I also added some words in colored icing, and then decided to let everything set up because it was midnight, and the Barnum’s animal crackers that mom had shipped from the US hadn’t arrived yet. On Saturday, I headed to the party a couple hours early – with the needed bits to complete the cake. Luckily, J’s package from the US had arrived – with Barnum’s Animal Crackers – so I could complete the cakes.

Slowly, I sorted through the animals, attaching the Elephants, Bears, Seals, Giraffes, Lions, and tigers around the larger of the cakes. Then, I added chocolate “bars” to each of the Circus train car carriages.

Leo's 1st Birthday
Leo's 1st Birthday

Leo's 1st Birthday

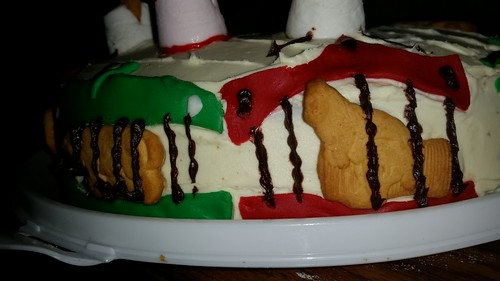
To the top of each cake, I took a pair of scissors and “snipped” the top of each marshmellow and added the Animal biscuits inside. Then came the “decorating” of the marshmellows – to look like “drums” and adding of gumdrops (also in the shape of the “drums”) and other little details. This “completed” the 3 cakes, of the three ring circus.

Leo's 1st Birthday

Leo's 1st Birthday

Leo's 1st Birthday

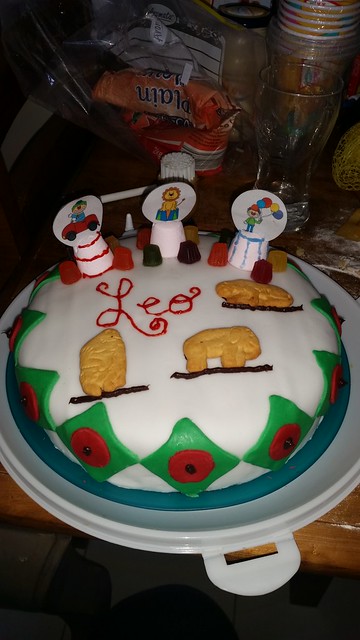
In the end, they turned out looking pretty great, and with the addition of the candles (one for each cake – he was turning 1 – not 3) it looked pretty spectacular, now, let’s eat!

Leo's 1st Birthday

Share

From Shed to Chic

The old shed...

Earlier in May, I moved from my old apartment in Blanchardstown to a new (to me) rental home in Castleknock – about 10 minutes away from where I was. The home is about 25 years old, and made of cinder blocks. The inside is pretty standard for a 3 bedroom 2 level home, though it needs some work for modernisation and updating. The yard/ garden is a good size – but you can tell it hasn’t had much work recently. (The last renters left the place in quite a poor state).

When I went to move in, I explained to the renting agency that myself and my roommate are two professional ladies, and that my father has owned a grounds maintenance / landscaping business for 20+ years. I grew up with grandparents that farmed and then my father who constantly was putting me to work with flowers, planting, mowing, and taking care of a yard / garden. I could see the “potential” of the property – and couldn’t wait to make it beautiful again. Well, I think that was the clincher.

After a slow start to getting moved into the house and some challenges with getting some of the basics in (Internet, phone, gas, and an electric cable taken out of the trees), I decided to set to work. The old shed in the back garden was an absolute eyesore. Paint peeling, weather beaten, and bug infested it made a pretty “rustic” and “rural” picture (see the top) when it was in black and white. However, when I put a couple chairs out there, I just couldn’t bring myself to look a it – it looked like a ruin.

BEFORE:

Repainting the shed... diy...The Before

closeup of the door & panels (peeling paint, weather beaten, and bug infested:

Repainting the shed... diy... before (closeup)

The first day, I set to scraping, sanding, and scrubbing it down with sugar soap. Even that made a difference on the poor old shed – and showed off the green algae that had taken hold on the bottom of the door.

All Sanded, Scraped, and Sugar Soaped:

Repainting the shed... diy...Sanded down

Repainting the shed... diy...Sanded down

Repainting the shed... diy...Scraped & sanded

After about 4 hours doing the above, the evening was over. The next day, I started coating the shed – 3 coats of a bug killer, wood protector and a wood sealer. You can see that it’s half done here, and even that it started looking a bit more “loved”:

Repainting the shed... diy...Sealing - first coat

Repainting the shed... diy...bug coat / sealing

Next up was the painting. 3 coats of the green heavy duty 5 year waterproof paint with wax to help keep it looking good for a long time.

First coat:

Repainting the shed... diy...

Repainting the shed... diy...

Second & third green coat & the start of the primer for the white:

Chic Shed - adding the white trim

Finally, the high gloss white paint to contrast the flat dark forest green:

Chic Shed - Encore!! (Time for a beer!)

Chic Shed - completed

And it’s all completed. My shed has gone from “Oh Shed” to “Oh Chic”, from an ‘eyesore’ to “needs an encore”. I’m pleased it’s become a garden feature, and looking forward to getting in some flowers and plants to really make the place look more appealing in the coming months.

Starting last weekend with scraping, sanding, and scrubbing; and then 3 coats of sealer and bug killer. Add in 3 hours after work for 3 days and 3 coats of heavy duty 5 year outdoor paint; and  this morning for the white primer and trim x2 coats. It won't

Total spent – 100 Euro, 24 hours (after work & the weekend)

And the shed? Well, it’s looking so much more loved.

My Chic little shed (all complete)

Share

Win Tickets to Berlin from the USA!

The Wall's Still Falling....

Back when I lived in Berlin, I was there for the 20th Anniversary of the fall of the wall. You can see more in my post here and here. I have to say that it’s one of the more memorable events from my time in Berlin.

This time, it can be you making the memories. 🙂

Be in Berlin for the 25th anniversary of the fall of the Berlin Wall – November 9, 2014. Win tickets from USA to Germany, 3 nights accommodation… enter at the link below after visiting my friend’s blog over at Euro Cheapo!

Enter to win 2 tickets to Berlin this November to celebrate the fall of the Wall!

Good Luck – and if you win, be sure to send me a postcard!

Share