Recycled Jar Lantern Crochet

Romantic Recycled jar lanterns. Add a citronella candle and hang from trees, summer umbrellas, or place on a table for a simple elegant barbeque or wedding centerpiece. Check my etsy store! https://www.etsy.com/shop/PhoenixRoseDesign   #PhoenixRoseDesign

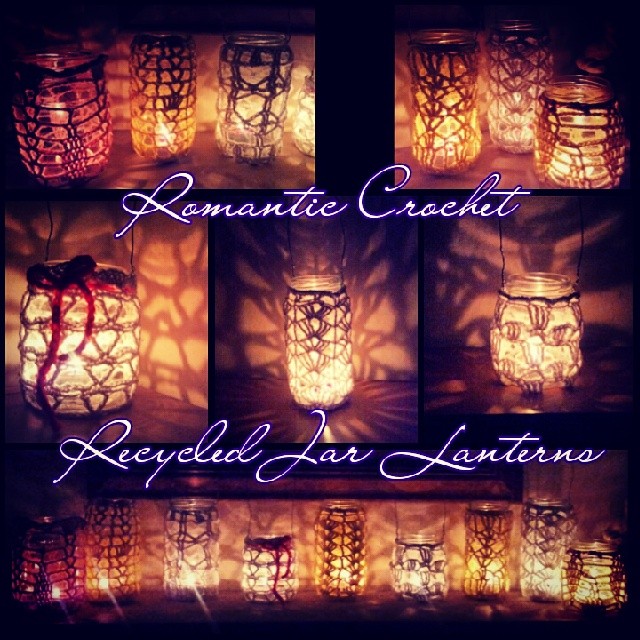
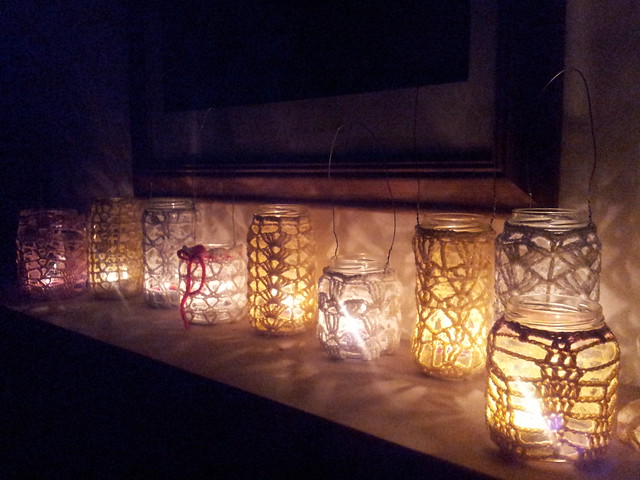
Welcome to Summer! Recently, I saw a great picture of a bunch of lanterns hanging in the trees around the back garden, with intricate Moroccan style beadwork and crochet. I decided to emulate this with my own patterns and designs – using recycled jars of all shapes and sizes.

Jar lanterns

Starting with cotton crochet thread that had tiny little silver sparkles in it, I made my first jar. I think it turned out adorable – especially after adding the wire loop to hang it from the tree.

Jar lanterns

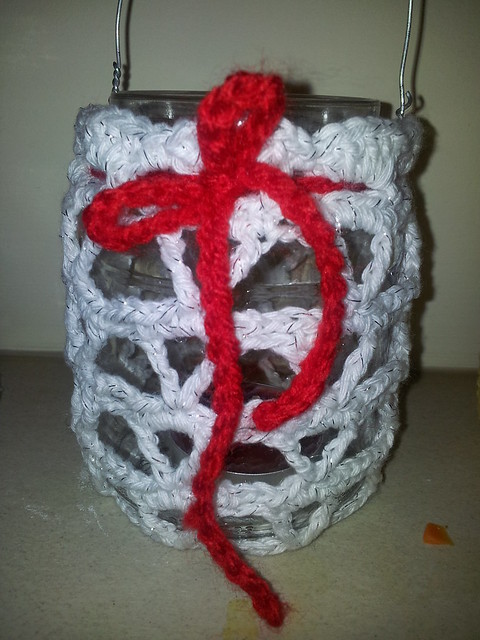
Once I hung it, I realized that the patterns I made in crochet were cast on the wall almost in a kaleidoscope type pattern. It’s pure awesomeness, and I had to make some for my etsy store!

Not only are they good for the environment, they are great for sprucing up your backyard barbecue parties, weddings, and even for adding an awesome touch to your glamping! Add a citronella candle and hang from trees, summer umbrellas, or place on a table for a simple elegant barbecue or wedding centrepiece which will be talked about for years.

Recycled jars crochet lanterns

These come in 3 sizes – with the jar included.

If you don’t wish for the jar included, I can sell the crochet cover separately -just message me.

Small – about 4 inches in height

Medium – about 6 inches in height

Large – about 7-8 inches in height

Recycled jars crochet lanterns

For more pictures of what I have available, or if you’d like to buy some for yourself, check my etsy store at: https://www.etsy.com/shop/PhoenixRoseDesign

Share

From Shed to Chic

The old shed...

Earlier in May, I moved from my old apartment in Blanchardstown to a new (to me) rental home in Castleknock – about 10 minutes away from where I was. The home is about 25 years old, and made of cinder blocks. The inside is pretty standard for a 3 bedroom 2 level home, though it needs some work for modernisation and updating. The yard/ garden is a good size – but you can tell it hasn’t had much work recently. (The last renters left the place in quite a poor state).

When I went to move in, I explained to the renting agency that myself and my roommate are two professional ladies, and that my father has owned a grounds maintenance / landscaping business for 20+ years. I grew up with grandparents that farmed and then my father who constantly was putting me to work with flowers, planting, mowing, and taking care of a yard / garden. I could see the “potential” of the property – and couldn’t wait to make it beautiful again. Well, I think that was the clincher.

After a slow start to getting moved into the house and some challenges with getting some of the basics in (Internet, phone, gas, and an electric cable taken out of the trees), I decided to set to work. The old shed in the back garden was an absolute eyesore. Paint peeling, weather beaten, and bug infested it made a pretty “rustic” and “rural” picture (see the top) when it was in black and white. However, when I put a couple chairs out there, I just couldn’t bring myself to look a it – it looked like a ruin.

BEFORE:

Repainting the shed... diy...The Before

closeup of the door & panels (peeling paint, weather beaten, and bug infested:

Repainting the shed... diy... before (closeup)

The first day, I set to scraping, sanding, and scrubbing it down with sugar soap. Even that made a difference on the poor old shed – and showed off the green algae that had taken hold on the bottom of the door.

All Sanded, Scraped, and Sugar Soaped:

Repainting the shed... diy...Sanded down

Repainting the shed... diy...Sanded down

Repainting the shed... diy...Scraped & sanded

After about 4 hours doing the above, the evening was over. The next day, I started coating the shed – 3 coats of a bug killer, wood protector and a wood sealer. You can see that it’s half done here, and even that it started looking a bit more “loved”:

Repainting the shed... diy...Sealing - first coat

Repainting the shed... diy...bug coat / sealing

Next up was the painting. 3 coats of the green heavy duty 5 year waterproof paint with wax to help keep it looking good for a long time.

First coat:

Repainting the shed... diy...

Repainting the shed... diy...

Second & third green coat & the start of the primer for the white:

Chic Shed - adding the white trim

Finally, the high gloss white paint to contrast the flat dark forest green:

Chic Shed - Encore!! (Time for a beer!)

Chic Shed - completed

And it’s all completed. My shed has gone from “Oh Shed” to “Oh Chic”, from an ‘eyesore’ to “needs an encore”. I’m pleased it’s become a garden feature, and looking forward to getting in some flowers and plants to really make the place look more appealing in the coming months.

Starting last weekend with scraping, sanding, and scrubbing; and then 3 coats of sealer and bug killer. Add in 3 hours after work for 3 days and 3 coats of heavy duty 5 year outdoor paint; and  this morning for the white primer and trim x2 coats. It won't

Total spent – 100 Euro, 24 hours (after work & the weekend)

And the shed? Well, it’s looking so much more loved.

My Chic little shed (all complete)

Share